How to Master Mechanical Clock Maintenance: A Step-by-Step Guide for Beginners
- Tecniz Clocks
- Mar 13
- 9 min read


When should you perform mechanical clock maintenance? If you're waiting for your clock to grind to a halt before servicing it, you're setting yourself up for a hefty repair bill.
In fact, neglecting regular maintenance can cost you up to 75% of your original restoration price.
The good news? Proper care is simpler than you might think. Experts recommend oiling your clock every two to three years and thorough cleaning every five to ten years. Above all, consistent maintenance ensures your timepiece lasts for generations.
We've put together this beginner-friendly guide to walk you through everything you need to know about keeping your mechanical clock in perfect working order.
Key Takeaways
Master these essential maintenance practices to keep your mechanical clock running smoothly and avoid costly repairs that can reach 75% of your original restoration investment.
Oil your clock every 2-3 years and schedule professional cleaning every 5-10 years to prevent oil breakdown that creates abrasive sludge damaging internal components.
Establish consistent weekly winding routines and never force the key past resistance to maintain proper power transmission and prevent mechanism damage.
Maintain stable environmental conditions between 65-75°F with 35-55% humidity, away from direct sunlight and vibrations to preserve your clock's longevity.
Monitor timing accuracy regularly and adjust pendulum position or rating screws gradually - one full turn changes timing by 1-2 minutes per day.
Create detailed maintenance records to track service dates and ensure you stay on schedule for professional servicing every 7-8 years.
Consistent care transforms what could be expensive emergency repairs into manageable routine maintenance, ensuring your timepiece operates beautifully for generations while preserving its antique value and original components.
When should you perform mechanical clock maintenance? If you're waiting for your clock to grind to a halt before servicing it, you're setting yourself up for a hefty repair bill.
In fact, neglecting regular maintenance can cost you up to 75% of your original restoration price.
The good news? Proper care is simpler than you might think. Experts recommend oiling your clock every two to three years and thorough cleaning every five to ten years. Above all, consistent maintenance ensures your timepiece lasts for generations.
We've at Tecniz Clocks has put together this beginner-friendly guide to walk you through everything you need to know about keeping your mechanical clock in perfect working order.
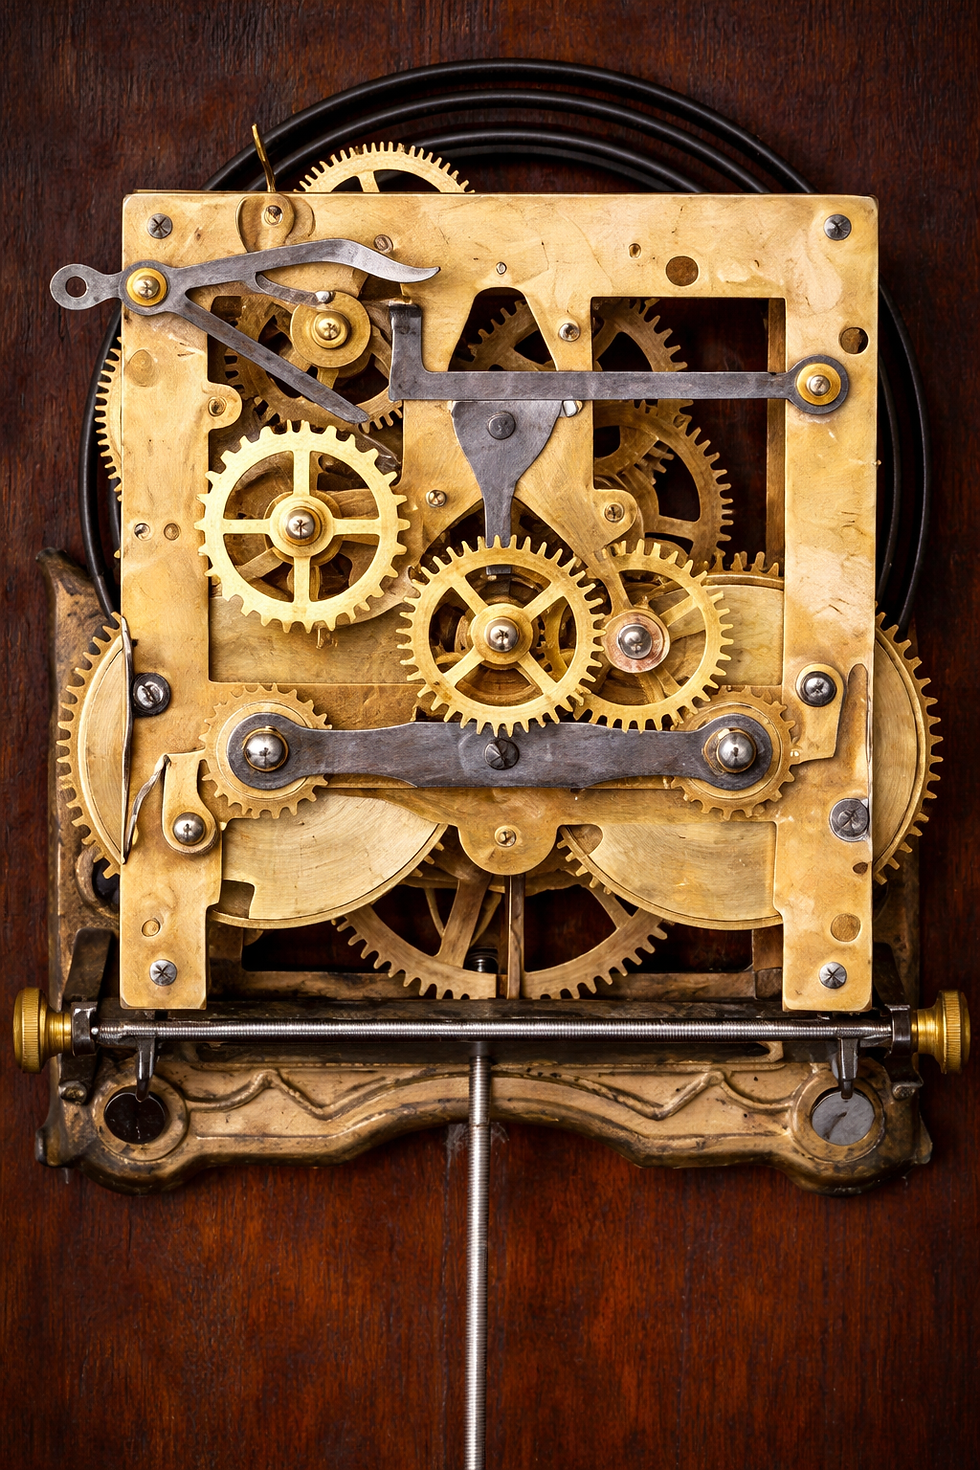
Why Mechanical Clock Maintenance Matters
Clock Oil Doesn't Last Forever
Clock oil does not last indefinitely. Over time, it undergoes several destructive changes that can silently damage the internal movement of your timepiece if maintenance is neglected.
Oil Breaks Down Over Time
As clock oil ages, lighter components slowly evaporate. The remaining oil becomes thicker and more viscous, reducing its ability to properly lubricate delicate moving parts inside the clock.
Oxidation and Contamination
With time, oxidation darkens the oil and weakens its lubricating properties. At the same time, the oil attracts dust and microscopic airborne particles, eventually turning into an abrasive sludge.
Dust Particles Are Always Present
Even in clean homes, tiny airborne particles settle inside the clock mechanism. When these particles mix with aging oil, they accelerate the breakdown of lubrication and increase mechanical wear.
Sludge Acts Like Sandpaper
Contaminated oil behaves like fine sandpaper between brass plates and steel pivots. This abrasive mixture gradually wears down precision components that were originally designed to operate smoothly.
Friction Damages Clock Components
Without proper lubrication, friction slowly removes material from brass plates and bushings. Over time, pivot holes begin to enlarge and deform, causing instability within the movement.
Pivot Surfaces Begin to Wear
Once the oil completely dries or gums up, the pivots themselves start to wear. The smooth, mirror-polished surfaces become rough and uneven, increasing resistance in the gear train.
Increased Power Required for Movement
As surfaces become rougher, the clock requires more power to move each wheel. This added resistance strains the entire mechanism and reduces efficiency.
Wear Accelerates Rapidly
Once oil has broken down, wear begins to accelerate exponentially. By the time visible symptoms appear—such as the clock slowing down or stopping—significant internal damage may already exist.
The Importance of Regular Servicing
Professional servicing every 5–10 years prevents costly repairs by addressing lubrication issues before serious wear occurs.
Long-Term Benefits of Maintenance
Routine maintenance improves timekeeping accuracy, restores smooth power transmission, preserves the value of antique clocks by protecting original components, and extends the lifespan of the movement for decades. A well-maintained clock can run beautifully for many years with only minimal adjustments.
Step-by-Step Mechanical Clock Maintenance Guide
Mechanical clocks are precision instruments that require regular care to ensure long life and accurate timekeeping. With patience and careful handling, basic maintenance tasks such as winding, regulating time, and ensuring proper placement can be done at home. Below is a detailed step-by-step guide to help you maintain your mechanical clock safely.
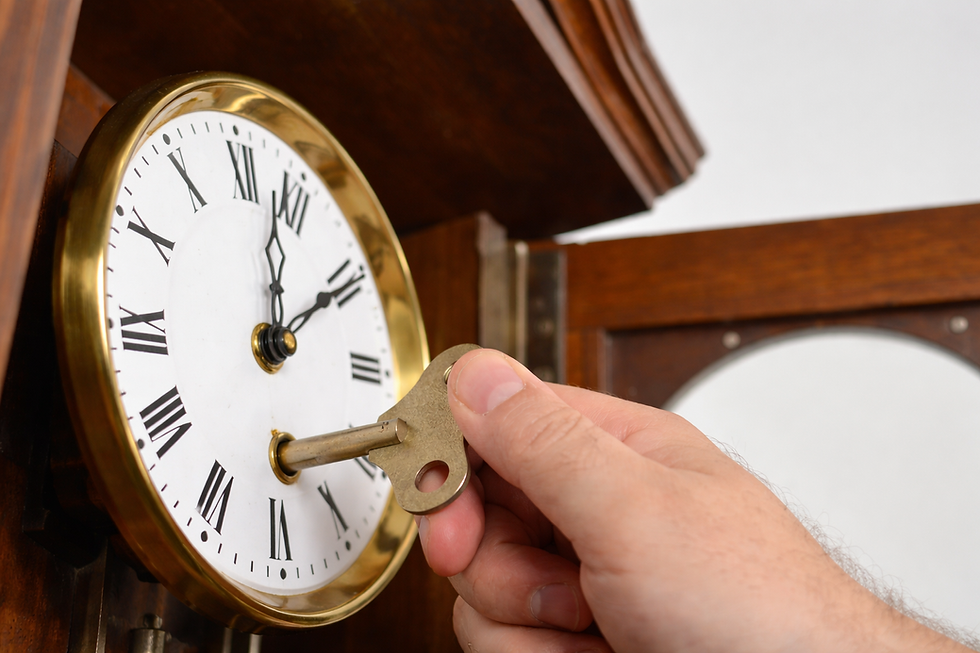
1. Establish a Proper Winding Routine
Regular winding is the most important part of mechanical clock maintenance. Most traditional mechanical clocks are eight-day clocks, meaning they need to be wound once every week.
Step 1: Open the Clock Case
Carefully open the glass door or front panel of the clock case. This provides access to the dial and the winding arbors (small holes where the winding key is inserted).
Step 2: Insert the Winding Key
Insert the correct winding key into the arbor. Mechanical clocks usually have one, two, or three winding points depending on the movement.
Single arbor: powers timekeeping
Two arbors: timekeeping and strike
Three arbors: timekeeping, strike, and chime
Step 3: Wind the Clock Slowly
Turn the key clockwise slowly and steadily.
Continue winding until you feel firm resistance.
Do not force the key beyond the stopping point, as this can damage the mainspring.
Always wind each arbor fully to maintain consistent power.
Step 4: Create a Weekly Routine
Choose a fixed day and time each week to wind your clock. This helps maintain consistent power delivery to the movement and improves time accuracy.
Tip: Many collectors wind their clocks every Sunday evening.
2. Maintaining Weight-Driven Clocks
Some mechanical clocks use weights instead of mainsprings to power the movement.

Step 1: Identify the Weight System
Weight-driven clocks usually have chains or cables attached to hanging weights.
Step 2: Raise the Weights
To rewind the clock:
Pull the loose end of the chain downward, which raises the weight.
If your clock uses cables, use the crank key provided with the clock.
Step 3: Raise the Weights Fully
Raise each weight until it reaches the top of the case.
Important: Do not let the weights hit the top abruptly. Lift them gently to avoid strain on the mechanism.
3. Regulating Time Accuracy
Mechanical clocks may run slightly fast or slow. Small adjustments can correct this.
Step 1: Monitor Time for 24 Hours
Compare your clock's time with a reliable source such as your mobile phone or digital clock.
Note the difference after 24 hours.
Step 2: Adjust the Pendulum Bob (Pendulum Clocks)
Pendulum clocks use a pendulum bob adjustment nut to regulate time.
If the clock runs fast, move the pendulum down or turn the nut to the left.
If the clock runs slow, move the pendulum up or turn the nut to the right.
Step 3: Make Small Adjustments
One full 360° turn of the nut usually changes the clock’s time by 1–2 minutes per day.
Make adjustments gradually and observe the clock for another 24 hours before adjusting again.
4. Adjusting Balance Wheel Clocks
Some mechanical clocks use a balance wheel instead of a pendulum.
Step 1: Locate the Rating Screw
The rating screw is usually located on the balance assembly or regulator index.
Step 2: Adjust the Screw
Turn clockwise to slow down the clock.
Turn counterclockwise to speed up the clock.
Step 3: Test the Adjustment
Allow the clock to run for at least one full day before making additional adjustments.
5. Ensure Proper Clock Leveling
Correct placement is essential for proper mechanical operation.

Step 1: Check the Surface
Place the clock on a stable and vibration-free surface such as a sturdy shelf or wall.
Step 2: Use a Bubble Level
Use a small bubble level to check the clock’s alignment.
Check:
Left to right
Front to back
Step 3: Adjust the Clock Position
If the clock is not level:
Adjust the mounting position
Use small shims or adjust leveling feet (if available)
Proper leveling helps prevent timing drift and pendulum stalling.
6. Checking the Clock Beat
A mechanical clock must run “in beat” for reliable operation.
Step 1: Listen to the Tick-Tock Rhythm
A properly adjusted clock produces a steady and even tick-tock sound.
Example of correct rhythm: Tick…Tock…Tick…Tock
Step 2: Identify an Uneven Beat
If the sound becomes irregular, such as:
Tick..Tock…Tick….Tock
the clock may be out of beat, which can cause the pendulum to stop.
Step 3: Adjust the Pendulum Crutch
The pendulum crutch (the fork that holds the pendulum rod) can be gently adjusted.
Move it slightly to restore an even tick-tock rhythm.
Make only very small adjustments.

7. Basic Cleaning and Environment Care
Mechanical clocks perform best in clean, stable environments.
Keep the Clock Away From
Direct sunlight
High humidity
Strong vibrations
Air vents or heaters
Dust the Case Regularly
Use a soft microfiber cloth to clean the case and glass.
Avoid spraying cleaners directly near the clock movement.
8. When Professional Servicing Is Needed
Even with proper care, mechanical clocks require professional servicing every 5–10 years.
A clockmaker can:
Clean the movement
Replace worn bushings
Re-oil the gears
Inspect mainsprings and pivots
Professional servicing prevents long-term damage and ensures smooth operation.
Final Tip: Mechanical clocks are delicate heritage pieces. Always make slow, small adjustments and never force any component. Regular winding, proper leveling, and gentle time regulation will keep your clock running accurately for decades.
How to Keeping Your Clock Running for Generations
Environmental conditions determine how long your clock runs between professional services. Keep your timepiece away from direct sunlight and moisture. Sunlight fades finishes and damages internal components, while humidity causes rust and warping.
Aim for a stable temperature between 65°F and 75°F with humidity levels maintained between 35% and 55%.
Mount your clock on a sturdy wall where vibrations won't disturb its operation. Avoid high-traffic areas and frequently slammed doors. Similarly, position it away from heating vents, radiators, and air conditioning units that create temperature fluctuations.

If you plan to be away for more than a week, wind both keyholes fully before leaving. Insert the black tube provided with your clock into the winding arbor to prevent complete wind down.
When moving a Ship's Bell clock, place a stop tube in one of the winding holes so the mechanism can't advance. Always remove the pendulum and wrap detachable parts in soft materials during transport.
Professional servicing every seven to eight years keeps your clock running smoothly. Keep records of service dates to stay on schedule. For quartz pendulum clocks, check batteries regularly for leaks and remove them during storage.
Conclusion
You now have everything you need to maintain your mechanical clock and prevent expensive repairs down the road. Regular oiling every two to three years and professional servicing every five to ten years will keep your timepiece running smoothly for generations.
Without doubt, the key to successful clock maintenance is consistency and creating proper environmental conditions. Start implementing these practices today, and your clock will reward you with decades of reliable service.

FAQs
How often should I have my mechanical clock professionally serviced?
Mechanical clocks should be professionally cleaned and oiled every 5-10 years to prevent wear and maintain optimal performance. Additionally, oiling should be done every 2-3 years to ensure proper lubrication of the movement.
Can I use WD-40 or household oils to lubricate my clock?
No, you should never use WD-40, motor oil, or vegetable oil on a clock movement. These products are either too thick, too acidic, or will dry into a sticky residue over time, causing severe damage to the delicate components.
What environmental conditions are best for keeping a mechanical clock?
Keep your clock in a stable environment with temperatures between 65°F and 75°F and humidity levels between 35% and 55%. Avoid direct sunlight, moisture, heating vents, and areas with vibrations or temperature fluctuations.
How do I adjust my pendulum clock if it's running fast or slow?
If your clock runs fast, move the pendulum bob down or turn the adjustment nut to the left. If it runs slow, move the bob up or turn the nut to the right. One complete 360-degree turn of the nut changes the time by 1-2 minutes per day.
What happens if I neglect regular clock maintenance?
When oil breaks down over time, it becomes thick and attracts dust, forming an abrasive sludge that acts like sandpaper on the movement's components. This causes accelerated wear, enlarged pivot holes, and can result in repair costs up to 75% of the original restoration price.


Comments